Archive for February 2013
Bush sunflower opening

Another thing I photographed along Great Northern Blvd. in north-central Austin on February 19 was this Simsia calva, known as the (awnless) bush sunflower, beginning to open.
Good-bye February; tomorrow March marches in.
© 2013 Steven Schwartzman
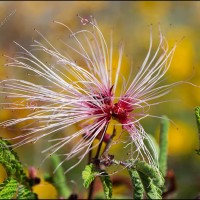
Sundrops

Click for greater clarity.
Sundrops: a brighter and more compact name for Calylophus berlandieri than square-bud primrose, which is also in common use. I photographed this plant flowering along Great Northern Blvd. in north-central Austin on February 19. You saw a few of these flowers late last April as part of an expansive, mostly two-tone-yellow wildflower display, but this is the first closeup to appear here.
© 2013 Steven Schwartzman
And a look at an even denser and more vibrant blossoming redbud tree

Click for greater clarity.
The title of the post says it all. Well, not quite: I made this photograph of Cercis canadensis yesterday morning, February 25, along Rain Creek Parkway in my northwest Austin neighborhood.
Sky blue will be back tomorrow, but with a bright yellow shining at its center.
© 2013 Steven Schwartzman
A closer look at a blossoming redbud tree

Click for greater clarity.
You recently got a look at a redbud tree, Cercis canadensis, that was doing a good job of blossoming on February 13. Two days later, across the street from the flowering huisache tree that you also recently saw, I found a graceful redbud doing its thing on the prairie. This pastel view, closer than the last one, gives you a better look at the way blossoms and branches typically work together in this species.
© 2013 Steven Schwartzman
A forgotten picture reclaimed

I’ve been using a Canon EOS 5D Mark III for the last few months, but after I briefly switched back to the 7D one day about a week ago to increase my telephoto range, I discovered that there was a never-downloaded picture from December 28th on the card in the older camera. It’s fun to find things that I’ve left for myself to discover, and now you get to discover it, too.
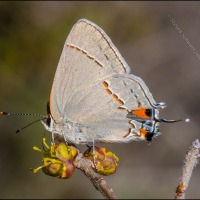
In taking this picture I had to shoot through window glass and foliage, and the light was poor, but I managed to get off a single shot with a clear view of this squirrel’s mouth as it bit off one drupe of a yaupon tree, Ilex vomitoria (the same species you saw laden with fruit in yesterday’s photo). Then the squirrel scampered off before I could take any more pictures; you know how quickly squirrels can move.
I generally prefer photographing possumhaws, Ilex decidua, which by shedding their leaves in the winter make a great display of their densely clustered drupes, but this yaupon, which for some reason has never produced a lot of fruit, had two advantages: [1] it was (and still is) right outside the window next to my computer [2] squirrels were visiting it (and they still do).
© 2013 Steven Schwartzman
A guest picture

Click for greater clarity.
In addition to the Texas mountain laurel that we saw at the Mueller prairie restoration on February 17th, there was a particularly picturesque yaupon, Ilex vomitoria, that bore lots of fruit. It was The Lady Eve* who took this photograph of it, in which she contrasted the tiny red drupes of the tree with the similarly colored but much larger metallic sculpture beyond it. Chris Levack‘s sphere, which has a diameter of 14 ft. (4.3 m) and represents a grain of cactus pollen, is appropriately named Pollen Grain; the work was erected in 2008.
——-
The Lady Eve also happens to be the name of an excellent 1941 comedy directed by Preston Sturges and starring Barbara Stanwyck and Henry Fonda.
© 2013 Steven Schwartzman
Texas mountain laurel blossoms return

On February 17th we wandered over to the prairie restoration at Austin’s former Mueller Airport and found that the Texas mountain laurels, Sophora secundiflora, had begun not a second flowering but their first one of the spring. Note the prominent pods left over from last year.
© 2013 Steven Schwartzman
Not exactly the repeat picture that it appears to be

Click for greater clarity.
In a comment on this morning’s picture, Cindy Taylor wrote that she kept looking for something hidden in the thicket of dried-out giant ragweed stalks. Her comment made me think that such a dense picture would indeed be a good place to hide a message, and that’s what I’ve done with this follow-up photograph that at first glance (and second, and third, and fourth…) looks the same as the one from the previous post.
There’s nothing else new in this post, so if cryptography doesn’t appeal to you, you need read no further. On the other hand, if you’d like to decode the hidden message, here are the steps to follow. (You can also skip to the end of step 14 if you want to see the result of all those steps.)
I’ll give the instructions for Photoshop, but I assume Photoshop Elements and other photo editing programs that allow layers will work in a similar way.
1) Go back to this morning’s post and click on the image to bring it up in isolation in your browser window.
2) Copy this morning’s picture to your computer. On a Macintosh, which is what I have, all you have to do is drag the image to your desktop, where it will show up as an icon with the name giant-ragweed-colony-remains-7531.jpg. For Windows, I’m guessing that if you right-click on the image, one of the choices that comes up will be to save the picture to your computer. (On a Macintosh, control-clicking on the image offers that choice.) If one of you who uses Windows would like to confirm that or, if it’s wrong, let us know the right way to download a picture from a WordPress post, please do so.
3) Return to this follow-up post, click the picture to bring it up in isolation in your browser window, then copy it to your computer, where it should appear with the name hidden-message-7531.jpg.
4) In Photoshop, open the first picture you downloaded, the one called giant-ragweed-colony-remains-7531.jpg.
5) In Photoshop, open the second picture you downloaded, the one called hidden-message-7531.jpg.
6) From the Select Menu, choose All to select the entire image called hidden-message-7531.jpg. (You can also use the keyboard shortcut Command-A on a Macintosh or Control-A in Windows.) You should see “marching ants” around the edges of the image to confirm that all of it has been selected.
7) From the Edit menu, choose Copy. (You can also use the keyboard shortcut Command-C on a Macintosh or Control-C in Windows.)
8) Close the window containing hidden-message-7531.jpg. If asked whether you want to save changes, don’t save them.
9) Go back to the Photoshop window containing the first picture, the one called giant-ragweed-colony-remains-7531.jpg.
10) From the Edit menu, choose Paste (or type Command-V on a Macintosh or Control-V in Windows).
11) If the Layers panel isn’t already open, bring it up by going to the Window menu in Photoshop and choosing Layers.
12) In the Layers panel you should see that you now have a Background layer and a layer above it called Layer 1.
13) In the Layers panel, Layer 1 should already be selected, but if not, click to select it.
14) In the Blending Mode pop-down menu near the top left of the Layers panel, change the blending mode from Normal to Divide (you can also change to Difference mode, but the result won’t be as legible). You’ll now be able to read the hidden message.
If you don’t have appropriate photo editing software or don’t want to go through all those steps but would still like to see the result, click on the tiny icon below.
![]()
And for those of you who would like to know how to put a hidden message into a picture, here are the steps.
a) In Photoshop, open (or create) an image that’s filled with lots of tiny details in which you can hide a message.
b) From the Tools palette, choose the Type tool (or press T on your keyboard).
c) Click at an appropriate place in the image and type your message, then press the Enter key. (I used 24-point type for my message.)
d) In the Layers panel, you should now see that you have a Type layer above your Background layer.
e) With the Type layer selected in the Layers panel, go to the Opacity pop-down menu near the top of the Layers panel and change the opacity from 100% to something small. I think I used 16%.
f) From the Layer menu, choose Flatten Image to merge the text layer with the image layer.
g) Save this image that now has your message hidden in it.
Note that someone who wants to read the hidden message must have a copy of the original image as well, so of course you’d make the original available only to people who are authorized to read the message.
It’s the discrepancy between the two versions of the image that allows the message to be made visible. I used to do a lot of 3-D photography involving side-by-side pairs of images; the difference between the view from the left eye and the view from the right eye is what the brain uses to create the illusion of depth. Clever brain.
© 2013 Steven Schwartzman
And more remains from last year

Click for greater clarity and larger size.
Spring may be coming in, but many ghosts still remain from last year. On the same February 13th outing that took me past a couple of blossoming redbud trees, I later walked behind Seton Northwest Hospital and saw this dense thicket of stalks from a dried-out colony of giant ragweed, Ambrosia trifida. Artists talk about negative space, but this picture negates that and is positively filled from side to side and top to bottom.
If you’d like a reminder of what this high and highly allergenic species looks like when it flowers in the fall, you can look back at a post from 2011.
© 2013 Steven Schwartzman
More huisache flower globes

Click for better clarity and color.
On the partly cloudy morning of February 15, the day after I saw the first few huisache flowers of the season in my neighborhood, I found an Acacia farnesiana in a more advanced stage of blossoming. Notice how, from a distance, the human eye blends many of the small flowers and makes some boughs seem swathed in yellow-orange.
This majestic huisache, of which you’re obviously seeing only a part, is near the intersection of Northtown Blvd. and The Lakes Blvd. on the prairie in northeast Austin. A decade ago I wandered freely in nature there, before either of those streets existed, but more and more of that land has been developed and keeps being developed. Let’s hope that if this plot gets built on, which is likely, someone will have the good sense to work around the tree.
© 2013 Steven Schwartzman