About My Techniques
Those of you who are interested in photography may wonder how I got such and such an effect in one or more of the pictures that you see in this column, so let me explain a few of the things that I’ve done and give links to examples. I’ll list the techniques in no particular order but I’ll number them for easy reference in my posts. In the first few cases, I’m reminded of the adage that the three most important things in real estate are location, location, location, except that I’ve modified that to position, position, position.
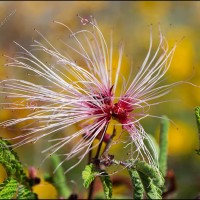
1) Get close.
There are photo-worthy details in many subjects that become visible only when you get close. Even point-and-shoot cameras often have a macro mode, and if you use an interchangeable-lens camera you can buy a macro lens for it. I took the majority of the pictures in this blog with a macro lens.
2) Shoot horizontally.
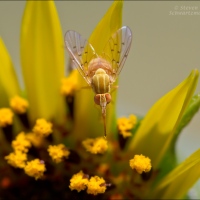
Often that means kneeling or sitting down to isolate a subject against things that are far enough away to remain nicely out of focus in the background. In the picture of a green lily budding, for example, the surrounding land has lost most of its detail; even less distinct is the background in the picture of a new cedar elm leaf. If a plant is growing along the bank of a river or lake, that body of water can become a mostly neutral background; an example of that is the seed head of a sunflower by a pond. Shooting horizontally, especially with a long lens, can also produce a different effect; with objects that are numerous but small, aiming horizontally can bunch them together and partly fill the spaces between them, as in the photograph of rain-lilies in a colony.
3) Shoot upward.
This is a variant of the preceding. Getting down low and shooting at a sufficiently raised angle lets the sky becomes the background. That could be a clear blue sky, as in the photograph of a Clematis drummondii flower and bud, or a softly clouded sky, as in the picture of the basket-flower with which I began this blog; it could also be an overcast sky like the one above some decomposing Texas thistles. Shooting upward also often allows you to eliminate distracting objects behind your subject, like cars, buildings, or people walking by. An example is the picture of a colony of Maximilian sunflowers, beyond which was a row of houses.
4) Play a bright subject off against a darker background.
By moving around your subject, you may be able to find a position that lines it up with something shaded in the background, like a grove of trees. That was what I did in the photograph of a mountain pink bud and flower with a stand of ashe juniper trees some distance away. Even greater was the contrast between sneezeweed flowers and the ashe juniper trees behind them, with the result that the background came out mostly black. If the background still isn’t fully black, you can darken it a little more when you process the image on your computer.
5) Play a subject of one color off against a background or a background element of a different color.
An example is the photograph of a coreopsis bud opening in front of a pink evening primrose. Another example, with a similar color scheme but in reversed positions, is the picture of a Texas thistle bud that appears against the bright yellow background of an out-of-focus colony of Engelmann daisies. And how about this buttonbush flower globe against a rich blue background?
6) Use an elongated format.
Your camera’s sensor has a fixed length-to-width ratio (often 3:2 or 4:3), but in processing an image you can crop to a more extreme ratio. An example of a vertically elongated picture is the one showing bugs mating on witchgrass, as well as the one of three-seeded mercury in flower. Even more elongated is the cropping of a photograph highlighting a heron’s extended neck and head. Two examples of horizontally elongated pictures are a dense colony of bluebells on the prairie and the patterns in the dry wood of a dead tree. In the photograph of switchgrass in autumn, the wide format conduces the viewer’s glance to follow the horizontally undulating forms of the grass.
7) Position your primary subject way off center.
People talk about the rule of thirds, which amounts to putting the primary subject a third of the way over from a vertical edge and simultaneously a third of the way above or below a horizontal edge in order to avoid the static image that can result from a centered subject. For example, in the picture of two ants entombed in a drop of sunflower resin, the ants occupy a position one-third over from the left edge of the frame and a bit more than one-third up from the bottom. But the rule of thirds is merely a guideline, and an even more extreme position is possible, as in the placement of the swallowtail butterfly in a wildflower-covered cemetery and of the flowering goldenrod played off against wispy clouds. And of course a centered subject may be just fine too.
8) Use a flash even in broad daylight.
One purpose of flash is as a fill light when a subject appears dark, as for example this sunflower did on a stormy day. Flash also helps when a subject has the light coming from behind it (photographers call that a backlit subject). If the backlighting is unusually bright, for example from the sun itself, you may have to set your camera to underexpose by several f/stops to keep from getting blown-out highlights in the photograph; then you can experiment with varying degrees of flash to brighten the subject of the picture enough to bring out its details. An example is a cattail partially blocking the sun.
Another application of flash, even with a well-lit subject, is in taking a close-up. In that case the flash lets you stop down your macro lens to a very small aperture, thereby increasing the depth of field and keeping as many details as possible of your subject in focus. An example is the close-up of Texas thistle flowers.
9) Isolate a portion of a subject to emphasize abstract patterns.
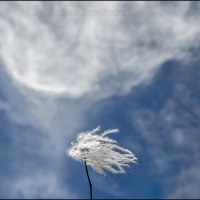
An example is the mottled patches and long needle shadows in the photograph of a stressed prickly pear cactus pad. Examples of patterns in softer subjects are the swirls in a Clematis drummondii seed head and the fluff and chaff of a bushy bluestem gone to seed.
10) Photograph a scene at a strange angle.
In this approach, the edges of the frame are not aligned with things normally seen horizontally (like the ground) or vertically (like a tree or upright plant). When things appear off-kilter, they can take on a dynamism they lack in a conventional view. An example is the photograph of a colony of snow-on-the-mountain. Of course something tilted is often just something tilted, and of no great merit, so I’d use this approach sparingly.
11) Combine parts of images to optimize focus.
Because of limitations of depth of field, and because things in nature move, it can be hard to get all the important parts of a subject in focus simultaneously. Sometimes I take several pictures in quick succession; in the similar photographs that result, a part of the subject may be in sharper focus in one image than in another. If so, I can copy the sharper part from that picture and paste it into the other to cover the corresponding less-well-focused area there. That’s what I did in the picture of the new cedar elm leaf. In the frame from which almost this whole image comes, the bottom margin of the leaf wasn’t quite as sharp as the rest of the picture, so I copied that part from a frame where it was sharper.
12) Photograph translucent objects with the light behind them.
If you can position yourself so that a translucent object is between you and the sun, the light will pass through the object on its way to the camera sensor. That often produces bright, saturated colors in the resulting image. The technique works well for a flat object like a leaf, provided that the plane of the leaf is perpendicular to your line of sight. Two examples of this technique in close-ups are a distressed sycamore leaf and a drying bulrush leaf, and one in a more traditional landscape is a flowering snow-on-the-prairie plant. Having something dark in the background, like a shadowed grove of trees, can make the effect especially dramatic, as with a Lindheimer’s senna flower and its pods. Sometimes you can even get translucence in animals, as in the photograph of a monarch butterfly. It’s best if the object you’re photographing fills most of the frame, or else you can get lens flare or orbs of light from any bright spots that end up visible in front of you; even those things, though, can sometimes work out well, as in the photograph of a copper lily.
13) Go with the flow.
If there’s movement in a scene, as is often the case in nature because the wind is blowing, you can use a high shutter speed to freeze objects when they’re off-kilter. That directionality can make for a more dynamic picture than if a colony of plants had just been standing there. An example is the photograph of cattails blowing, for which I used a shutter speed of 1/500 sec. to stop the action when the cattails were at one end of their arc. A closer and more extreme view using this technique is one showing poverty weed bending in the prairie wind. Another possibility is to do the opposite and use a slow shutter speed to create a blur while some of the objects in the scene move about. A good example of that is the photograph of firewheels, nightshade, and gaura blowing.
14) Less is more.
That’s the credo of minimalism, an approach that means filling the photographic frame with simple things, and not many of them, so that there is little to distract a viewer’s attention from elemental forms. A variant of that approach is to show a scene that has limited tonal range. A couple of pictures that exemplify both types of minimalism are those showing a gumweed flower head and a section of a bulrush leaf.
15) More is more.
This is the opposite approach from the preceding. An image can be effective when there are lots of details and most spaces within the picture are occupied. The resulting complexity ends up calling attention to itself beyond any of the individual elements. An example in an intimate landscape is the picture of a flowering group of snow-on-the-mountain plants, and an example in the macro world is the photograph of Clematis drummondii swirls.
16) Photograph the same subject in different stages of its existence.
In the botanical world we often photograph flowers, which most people find the most attractive stage in a plant’s life, but the other stages have their charms too and shouldn’t be rejected out of hand: shoots, buds forming, buds opening, the plant going to seed, its seeds and fruits, the plant when it dries up, etc. Sometimes I include different stages in the same photograph, as in the picture of a camphorweed bud just opening alongside a flower head that is already fading.
17) Arrange things (or be lucky!) so that there’s an echo in the background of something in the foreground.
An example is the photograph of flameleaf sumac turning color, where the leaflets that fill most of the frame are echoed by smaller versions of themselves farther back along the left edge of the picture.
18) Favor diagonals.
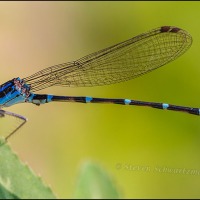
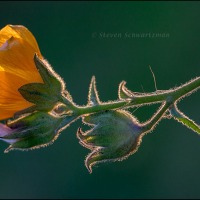
That can be accomplished with the approach in point 10 above, but it can also happen when the camera remains level but the subject itself fills the frame in such a way that there are strong diagonal elements. An example is the picture of a possumhaw tree with fruit, in which there’s a pronounced line from the upper left corner almost to the lower right corner; perpendicular to that are shorter angled lines of red that go up and to the right. Another example is a photograph of a red admiral butterfly in which the antenna and a rear leg lie along one diagonal, while the cutting edge of the butterfly’s wing and some smaller elements emphasize the other diagonal.
19) Limit your color range.
While I’m as enamored of gorgeous colors as anyone else, sometimes a photograph with a limited color range can be effective. For example, the picture showing two stages in the life of goldeneye has just three color elements: yellow, white, and black. The photograph of the remains of marsh fleabane has an almost monochromatic feel to it.
20) Limit what’s in focus.
Having just one thing—presumably the most important thing—in focus can make the subject stand out in an image where everything else is soft and dreamy. An example is the photograph of a drop of sunflower resin. In that picture I intentionally limited the focus, but sometimes low light leaves me no choice (unless I use flash, which can be harsh). An example is the picture of an anole, for which I had to open up to my macro lens’s widest aperture of f/2.8. The result was that only the upper surface of the lizard’s snout was in focus, but I thought the image was still all right.
21) Favor crop circles.
No, not the ones in fields of grain. When a subject is inherently circular, cropping its photograph circularly can emphasize that shape and the abstract radial patterns within it. An example is the top of a lace cactus. A circle is just a special case of an ellipse, so cropping an elliptical subject elliptically works at times too. An example of that is the mandala of a sunflower seed head. These types of cropping can have the added benefit of removing junk in the corners of the original rectangular image that distract from the subject at the center.
22) Use a ring flash for macro photos.
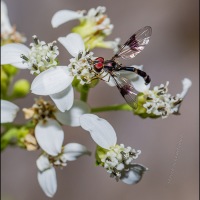
If you take macro photos, a flash that’s built into your camera or an external flash that sits on top of your camera can create harsh shadows on one side of your subject. To get around that, literally, you can use a ring flash, which is a circular flash that fits over the front of your macro lens. Because the light comes from all directions simultaneously, there’s no harsh shadow on one side. An example is the photograph of two pearl milkweed flowers.
23) Shoot edge-on.
Shooting a subject edge-on can limit depth of field, but it sometimes produces an appealing picture. One example is the photograph of a tiny fly on a fleabane daisy, although you could argue that the edge-on flower isn’t the picture’s primary subject. Another example is the photograph of pearl milkweed flowers, where the edge-on view reveals colors and shapes that otherwise wouldn’t be apparent.
24) Invert the normal order of things.
We’re used to thinking of clouds above (or mixed with) blue sky, and terrestrial objects below both. Sometimes I like to get close and aim upward at a subject in such a way that the clouds end up at the bottom of the photograph while the blue sky and at least a portion of my subject loom above the clouds. One example is a picture of a flameleaf sumac changing colors, and another is a partridge pea plant turned red rising above cumulus clouds on the Blackland Prairie.
25) Convert to black and white.
As a more-extreme take on 19), I’ll point out that once in a while a black-and-white rendition of a photograph does a better job of bringing out intricate patterns than the original color version does. That’s because areas of color can call attention to themselves and distract the viewer from perceiving abstract patterns. One example is a photograph of the fractal-like leaves of a white prickly poppy.
26) Block the sun.
In this variant of point 12, a subject is again backlit, but this time the subject is opaque rather than translucent and is position to block the sun in order to keep the intense light from blowing out the picture. The object that blocks the sun will appear outlined in light or have a halo of light around it. Both of those effects appear in the picture of this saguaro cactus. In the case of a cattail, the subject is narrower and the halo therefore more intense, so I purposely underexposed the photograph to keep the highlights in check; to compensate for the resulting darkness of the cattail, I used technique 8.
27) Partially block the sunlight.
Bright sunlight casts harsh shadows and can make things look garish. If your subject is small, you may be able to get close enough to use your shadow to cover it and nearby surroundings, thereby putting the entire scene into subdued light. The downside of that approach is that things can seem dull. One way around the dullness is to position yourself so that your shadow covers the subject but not the background, which will remain brightly lit yet still pleasingly out of focus. An example is this bluebonnet inflorescence.
28) Photograph the same scene in different ways.
Even with the same camera and lens used in approximately the same place and pointing in the same direction, a photographer can make very different images of a scene. An example is the pair of photographs, one straightforward and the other more abstract and artsy, showing flowers of prairie agalinis and partridge pea.
29) Use a telephoto lens for landscapes.
It’s understandable that photographers often use a wide-angle lens to capture the sweep of a landscape. The wider the angle of the lens, the easier it is to keep everything in focus, which is a goal of most landscape photographers. In contrast, a telephoto lens necessarily limits the scope of your view and makes it harder to get good depth of field. Nevertheless, if your subject is far enough away and if you can shoot approximately perpendicular to its plane, you can still show a broad sweep and keep everything sharp. Mountains and other tall things lend themselves to that approach. For example, I took the picture of the Great Sand Dunes at a focal length of 215mm. Even with a relatively level subject you can still use a telephoto lens and keep everything sharp if you manage to shoot from a high enough vantage point and use a small enough aperture. An example of that is the photograph I took from up on a bluff looking partly downward at the shallow end of Medicine Lake with a focal length of 300mm and an aperture f/20.
30) Use one hand to steady an unstable subject and the other hand to work the camera.
I’ll grant you this is an unorthodox approach, one that many and probably most teachers of photography would recommend against. Nevertheless, idiosyncratic me has gotten accustomed to working that way, and I’ve used the technique to take many of the pictures that have appeared here. When possible I lean the camera against my forehead or cheekbone for added stability, and I select a shutter speed of 1/400 or faster. I used this technique for both of the photographs showing a robber fly on my left hand.
31) Photograph outdoors when the sky is overcast.
That way you’ll have gentle light. Taking a photograph outdoors under bright sunlight can create such a big difference in brightness between areas in shadow and those directly lit that your camera’s sensor can’t record both correctly at the same time. The two photographs of a creek in the woods are examples. The pictures that I took of that area whenever the sun had broken through the clouds were unsatisfactory, with hot spots as well as details lost in black shadows. Photographing with subdued light may require you to compensate by slowing the camera’s shutter speed, raising its ISO, widening the lens’s aperture, or some combination of those things.
32) Photograph a subject that’s more shaded than the background.
In the picture of a prairie verbena I used my body to shade the subject. It was a bright day and I wanted to reduce the sun’s harshness on the verbena. There was enough of ambient light to illuminate the flower.
33) Use HDR (high dynamic range) or mimic it.
In the HDR technique, you take several pictures of exactly the same scene but with differing exposures. Typically you overexpose in at least one record details in the shadows; you underexpose in at least one to bring overexposed areas back into a normal range. HDR software then combines the best parts of the separate photographs to make a final image. Even without taking multiple photographs and having HDR software merge them, you can use a single photograph and simulate the process in a program like Photoshop by pulling the sliders for Highlights and Whites way down, and pushing the slider for Blacks way up. That’s what I did in the top photo in a post about icicles. Shafts of sunlight caused a few hotspots in the scene, and I needed to tone them down. Even after adjusting Photoshop’s sliders as described, I had to manually go in to reduce some highlights and brighten some darker areas to reduce the contrast between them.
© 2022 Steven Schwartzman


After reading about your techniques I see how you take such great photos. I love macro too and recently upgraded my older Macro lens to a 105 2.8 VR Nikkor. I try to stabilize myself and don’t use a tripod, but sometimes I think I should use one. I feel a bit limited with a tripod and getting creative angles is key for me and being able to move around quickly. Thanks for sharing such wonderful work and I’ll have to check out more. It’s been an education for me.
Martina
July 31, 2011 at 10:40 AM
So we’re both using similar-length macro lenses, and we both try to stabilize ourselves to avoid the encumbrance of a tripod, which makes it harder to be spontaneous and to get creative angles. One other factor that I didn’t mention is spending a lot of time in nature: by putting myself out there frequently, I open myself up to new occurrences. No matter how many times I’ve photographed a given species, every now and then I see something new in it (or on it).
Stop back by any time and see what’s come my way recently. (I used to be a teacher, so explaining things is second nature—and I couldn’t resist the play on words with nature.)
Steve Schwartzman
July 31, 2011 at 11:37 AM
Can you recommend a good starter macro and ring flash? My birthday is coming up 😉
Lisa Vankula-Donovan
May 29, 2013 at 7:48 AM
The only ones I have experience with are the ones I’ve used, which you can see listed in About My Equipment. I used to own the Canon 100mm macro lens that doesn’t have image stabilization. It’s still available and costs only about half as much as the newer 100mm macro. I got lots of excellent pictures with it.
Steve Schwartzman
May 29, 2013 at 8:14 AM
How can someone learn to take beautiful, professional pictures of nature and natural landscapes?…
In June of 2011 I started a blog on nature photography in central Texas. As part of that, I posted an About My Techniques document that lists various things I do and provides links to photographs exemplifying those techniques. You can read the document…
Quora
August 8, 2011 at 9:14 PM
I don’t think I have seen a better – or better written – list of principles for closeup nature photography. These are really excellent. Most of my macro work tends to be highly controlled studio imaging, but even with non-macro work, all nature photography in the field would benefit from these principles. I’m going to link to this and keep it as a part of my basic reference collection. Really great work.
Joanne
November 22, 2011 at 2:53 PM
I appreciate that, Joanne. In some of my early posts I explained what I’d done when taking certain pictures, and rather than having to repeat myself the next time I wanted to point out any of the same techniques, I decided to compile a numbered list that I could refer to. The points in the document evolved over several months, and I still keep adding and refining when I feel there’s a reason to. I’m happy you find these principles useful.
Steve Schwartzman
November 22, 2011 at 4:19 PM
My work can’t begin to compare with yours, Steve, as my cameras are comparatively cheap ones (my budget won’t allow for any better). But the techniques that you use – and describe with simple clarity here – do sound familiar. I’ve even watched TV programs that mention sitting or lying on the ground. I’ve lain on the ground before to get that perfect shot and frightened people once or twice, LOL. I just wish my cameras had the settings that would make make one part of the shot really stand out while the background is a smooth blur. I have to futz around with my graphic arts program to get that; sometimes with good results, sometimes not.
I should comment on your 11th point above, I have been considering doing exactly that, copying and pasting parts of different shots of the same subject to create something that gives the illusion that the entire subject was in focus. I’m going to try it!
wildwanderingirl
December 14, 2011 at 1:30 AM
Most of these are things that I’ve found myself doing instinctively, and other photographers have too. Occasionally I seen one or more of these points made in writing or on television shows involving photography, so although I can’t claim any credit for novelty I’m glad that you find simple clarity in the descriptions. I’m also glad I can show readers at least one example of each point by using photographs from the blog.
Like you, I’ve startled people once or twice—and maybe plenty of other times that I’m not aware of. One time I was lying on the ground taking pictures and a woman stopped her car to see if I’d collapsed and needed help.
As for point 11, I’ve heard the process referred to most often as focus stacking. If you do an Internet search for that term you’ll find plenty of information about it, including links to software that combines images of the same subject taken with the camera focused at different distances. Good luck with your experiments.
Steve Schwartzman
December 14, 2011 at 8:15 AM
I am so grateful to have access to this list AND the stunning examples. You are incredibly generous to make such valuable information available in this format. Thank you!
Lemony(Gr)Egghead
January 11, 2012 at 9:49 PM
You’re welcome. Let’s hope some of these approaches lead you to new and favorable things.
Steve Schwartzman
January 11, 2012 at 9:54 PM
You are very good at explaining your techniques so one can learn more! Thanks for taking the time with your photographs and explanations in sharing with others like me!
Clover
clover58
January 13, 2012 at 3:39 PM
It’s the eternal teacher in me. Enjoy.
Steve Schwartzman
January 13, 2012 at 6:11 PM
This has been instructive. Thank you, Steve.
I have visited every one of your links and am now hooked. Heading off to the garden…
worldismycuttlefish
January 15, 2012 at 10:48 PM
Happy discoveries in your garden!
Steve Schwartzman
January 15, 2012 at 10:59 PM
Hi, Steve. I just came in to check this list again (I do it frequently… it’s a huge help to me). The one thing I’m “stuck” on is “8: Use a flash even in broad daylight.” I just haven’t managed to do this with a satisfactory result, but I am very new to using a flash, always having preferred to shoot in natural light as much as possible, so it is going to take me a while to get the hang of it. The cattail and thistle examples are fantastic. Now, I have a big favor to ask: I wonder if in a future post you might be willing to illustrate with a few more examples and/or also maybe show a comparative example (the same shot with and without flash?) Do you use a special kind of flash for macros? Although I don’t always have the time to comment, I am incredibly grateful (as I know so many other bloggers out there must be) for your highly instructive posts. Your photographs are spectacular. You are a teacher to many. Thank you!
Lemony (Gr)Egghead
January 31, 2012 at 7:05 AM
I’m pleased that you’re still finding these pointers helpful. One pitfall in using a flash is that it can overbrighten a subject and make it look fake. My camera has a setting that lets me increase and decrease the amount of flash; if an image looks washed out on the camera’s monitor, sometimes I’ll lower the intensity of the flash and try again. I’m talking about the built-in flash, but I also have a ringlight that I occasionally bring with me if I anticipate taking pictures of a difficult subject or one where the directional shadow cast by the built-in flash would be distracting.
In future posts I’ll try to remember to point out images taken with the flash on. Sometimes, especially if a lot of time has elapsed, I don’t remember whether I used a flash and I have to go back and look at the data to see if I did. That was the case with the thistle picture: without looking at the data I would’ve assumed the photograph was taken with sunlight alone.
As for a with/without pair, in a situation where I felt a flash was needed I probably wouldn’t show a version of the image without flash because it would be too dark and lacking in detail, and in this blog I do my best to show only pictures that I think are reasonably good. Ah, vanity!
Steve Schwartzman
January 31, 2012 at 7:31 AM
Thank you so much for your reply. I need to set aside some time to really get to know my flashes and practice. I do have that option of increasing and decreasing the amount of flash, so I should practice that. It is generous of you to offer to indicate whether an image has been taken with the flash on for future posts, when possible. I certainly understand your point about reserving your blog for only those images that are worthy. Thanks again! And I’ll stay tuned.
Lemony (Gr)Egghead
February 1, 2012 at 8:47 PM
Most excellent instruction. I’m still getting around your site bit-by-bit, when time permits. I particularly love that you link each technique to something visual. I will be passing this along for my lovers of nature photography. Thank you for all you do for the world of flowers in Texas!
Shannon
February 17, 2012 at 9:08 AM
I could say “Once a teacher, always a teacher.” In fact I just said it. I’m glad you’re finding these techniques useful, and I hope the people you pass this site’s location along to will find them helpful too. And yes, I do what I can to promote the local flora—if the mowers don’t cut it all down first.
Steve Schwartzman
February 17, 2012 at 11:56 AM
This is a wonderful page that I’ve not paid much attention to. However, I’ve thoughtlessly put myself in a position where I’m going to have to pay more attention to my photos. That means there’s a learning curve ahead, and I can see these tips will be helpful. Thanks for your generosity!
shoreacres
May 2, 2012 at 12:06 AM
You’re welcome, and Prost, as the Germans say in abbreviated Latin: May it be of use to you (except they say it when toasting with alcoholic beverages, which don’t generally help a person to take good photographs). Or as mathematical me might say: May your learning curve have a small positive slope.
Steve Schwartzman
May 2, 2012 at 6:33 AM
Excellent suggestions and definitely a few for me to experiment with.
Andrew
May 25, 2012 at 9:33 PM
Wear them well!
Steve Schwartzman
May 25, 2012 at 10:15 PM
Great info! Thanks for sharing!! 🙂
Nicole Ftacnik Photography
July 2, 2012 at 6:11 AM
My pleasure. Once a teacher, always so.
Steve Schwartzman
July 2, 2012 at 6:15 AM
Thanks for pointing to this in your Virginia Creeper post — it’s a good article 🙂
Mufidah Kassalias
December 14, 2012 at 6:29 AM
You’re welcome. I give a link to this article at the end of some posts but I don’t do it regularly. I generally do it when a particular point stands out as especially important for the picture I’m posting, like the translucence of the leaves and the elongated cropping in the picture of the Virginia creeper.
Steve Schwartzman
December 14, 2012 at 7:24 AM
This article is so useful! Thank you very much for sharing your techniques. 🙂
Inge
December 17, 2012 at 7:41 PM
And thanks for letting me know you find it useful. I gradually put the list together after posting pictures for a few months and looking at all of them to see what I had done to get the results I got.
Steve Schwartzman
December 17, 2012 at 7:52 PM
Interesting and very inspiring. I definitely need to learn a lot from you. 🙂
Inge
December 17, 2012 at 7:57 PM
Good article – again very reminiscent for me of my Dad’s work. I like the links to samples. Many of these techniques I use naturally, but one is new – using the flash in broad daylight. I’m not quite sure how to do that. I have a Canon EOS Rebel XtI with 2 lenses: 18-24 and 70-300 🙂 Marsha 🙂
tchistorygal
January 28, 2013 at 9:34 AM
I abstracted some of these points from looking at what I’d done, sometimes unconsciously, in my pictures. Describing the techniques is good, but having photographs to exemplify them makes them more understandable.
I believe the Rebels work similarly to the various other Canon models I’ve had, so to use flash in daylight I think all you have to do is press the button that makes the flash pop up at the top of the camera. My cameras have all let me raise or lower the intensity of the flash, and I suspect yours has that capability, too, so you can experiment to strike the right balance between the flash and the ambient daylight.
Steve Schwartzman
January 28, 2013 at 10:19 AM
Would it be possible for me to use some of your gorgeous pictures on our blog and give you credit? Redbuds, Texas Mountain Laurel, Cedar Elm?
Dallas Garden Buzz
March 10, 2013 at 8:53 PM
Yes, it’s okay to use those three pictures. (I’d appreciate it if you could add a link to this blog.) Happy spring (and we even had some rain here overnight).
Steve Schwartzman
March 10, 2013 at 10:33 PM
How very kind! For sure will do that and so glad to have found your blog! Ann
Dallas Garden Buzz
March 11, 2013 at 8:34 AM
Steve,
While you use a ring light, I usually use an external flash set on manual. Other times I use a small silver reflector which can sometimes be too much. I also use the 100mm macro f/2.8 and love it. I rarely use my 70-200 f/4. I might have to consider finding someone who has a ring light so I can give it a try although I do like some shadow detail in my wildflower photographs. BTW, I use a Canon 30D and a Canon 5D Mark ll and a sturdy tripod. The wind is always blowing here in Indiana.
You have a great blog and so far I have enjoyed seeing your work and knowing that there are others out there that can do well with the equipment they have. I can’t tell you the times I have looked at other supposedly professional photographers’ work and they looked like something a child attempted. So glad I found your blog.
Bob
bobh47955
March 26, 2013 at 5:00 PM
I’m glad that what you’ve found here pleases you.
Even when I use a ring light, I set it on manual and experiment to find an appropriate setting. Sometimes I use a conventional external flash, primarily with a lens other than the 100mm macro. I’m sorry that the 5D Mark III doesn’t have the built-in flash that my 7D (like your 30D) does; it’s handy for fill lighting in a hurry.
I use my 70-200mm f/4 often enough (as recently as an hour ago, in fact), normally with a 1.4X extender to make things seem closer and to compress depth.
All this equipment makes for a camera bag a lot heavier than I’d like, but that’s the price I’ve had to be willing to pay.
Steve Schwartzman
March 26, 2013 at 5:16 PM
Really interesting technique guide, I think I will have to put some of what you have said in to practice 😉 Thank you for writing it!
drlphotography
July 18, 2013 at 7:28 PM
You’re welcome. May the techniques be of use to you. I compiled them by looking at the photographs I was posting on this blog and seeing what I’d been doing.
Steve Schwartzman
July 18, 2013 at 8:45 PM
[…] and still get a good picture. Blogger and wildflower photographer Steven Schwartzman has a list of 40 things to say about getting the best shot. If you like flowers and want to see some examples, visit his […]
Out the Back Window – Tiny Fungi | The JAR Blog...
August 23, 2013 at 11:20 AM
Thanks for the plug, Jim. I’m still plugging away at my craft, always on the lookout for new approaches.
Steve Schwartzman
December 9, 2013 at 8:00 AM
[…] in very short order, however, I have learned much, especially from reading his discussions of techniques used to create the always beautiful images of Texas wildflowers which grace the pages of his blog. […]
Cardinal flower | Welcome to Pairodox Farm
August 26, 2013 at 6:37 PM
I’m happy to play online teacher, D., and to promote the native plants that we have so abundantly in Texas.
Steve Schwartzman
December 9, 2013 at 8:01 AM
[…] 4 Thanks to Steven Schwartzman for his idea to crop in circle the picture (list of techniques) […]
Pissenlit | Sophie L.
September 15, 2013 at 2:50 PM
The adage “What goes around comes around” seems an appropriate reply, Sophie.
Steve Schwartzman
December 9, 2013 at 8:05 AM
Just learned more than I ever knew about photography. In all honesty I know pretty much nothing about it so your blog has been a gold mine for me. Thank you for sharing your techniques. I can’t wait to get out and try them.
themysterymeat
December 9, 2013 at 6:23 AM
Happy experimentation to you. Maybe these techniques will lead you to end your lament: “It seems like each winter I think about how much time I didn’t spend outdoors doing the things I enjoy.”
Steve Schwartzman
December 9, 2013 at 8:08 AM
Thank you for sharing these techniques. They are indeed useful and helpful. As you know, as an amateur learning technique is on my long list of things I need to do, in addition to just getting out there and taking pictures. There’s so much to do and learn and that can be done on both ends – capturing and post-production – it’s both overwhelming and incredibly exciting. Your list of techniques, tips, suggestions is many steps in the right direction, especially coming from a prior teacher and experienced photographer.
Much appreciated,
eLPy
eLPy
January 28, 2014 at 5:19 AM
Thanks, and may these techniques be of use to you.
Steve Schwartzman
January 28, 2014 at 6:44 AM
[…] Schwartzman takes amazing photos of Texas wildflowers. I recently started using his photography tips in my nature shots. Yesterday he blogged about March 14 being π day (3.14 day). i love numbers […]
numbers make the world go round | Ockham's Razor
March 15, 2014 at 3:54 AM
These are really helpful and it is great to be able to follow the link and see your example. Worthy of a book or e book? Will be trying out a bridge camera in the new year. Once had a SLR but it ended up at the bottom of the Tambopata river in Peru. As yet 20 odd years later haven’t bought another but plan to develop the photography more now.
navasolanature
December 20, 2014 at 7:19 AM
Best wishes for bridging the gap. Your previous camera may have taken a dive, but the good news is that in the 20-odd years since then, digital photography has come into its own and cameras now offer more flexibility and features than ever.
Your idea for turning this into an e-book is a good one. I’ve been thinking about e-books along artistic lines, but this would be a practical approach. Thanks for the suggestion.
Steve Schwartzman
December 20, 2014 at 9:02 AM
I’ve not been over here for a while, and it was good to read the list again after being prompted by today’s post. I think I’ve internalized No.3. As a matter of fact, I made use of that tip when photographing some poverty weed.
Another recent photo came to mind when I read numbers 18 and 19. I even managed to pull off number 17 in the same photo, without realizing it was one of your tips. Behold: the beauty berry.
I can see where a few of my recent photos could have been improved with the addition of flash. And I think I’ve wrapped my mind around the reason(s) for the blown-out skies in some of my photos. I’m anxious for another chance to get out and see if my hunches are right.
shoreacres
November 16, 2015 at 9:03 AM
You certainly nailed it with your poverty weed picture. Nice going. Once again an aperture of f/8 kept many things in focus, and this time you had the sky as a neutral background to set off the details of the poverty weed tufts. The beautyberries were sharp too, even at f/5.
Let’s hope your hunch is correct and that you succeed in avoiding blown-out skies. Flash can sometimes solve that problem.
Steve Schwartzman
November 16, 2015 at 9:23 AM
[…] you’re interested in the craft of photography, point 18 in About My Techniques is relevant to today’s […]
Horsemints flowering with firewheels | Portraits of Wildflowers
May 19, 2018 at 5:11 AM
[…] of playing off a subject of one color against a background of another. (In fact it’s #5 in About My Techniques.) With that in mind, here from the Lady Bird Johnson Wildflower Center on September 26th are two […]
Playoffs | Portraits of Wildflowers
October 10, 2018 at 4:44 AM
Thank you for sharing this excellent tutorial, Steve. The list is very useful and helpful, I’ll save this one. 🙂
Dina
October 10, 2018 at 5:38 AM
You’re welcome, Dina. I worked as a teacher for many years, so it’s natural for me to think about ways of achieving ends. May these techniques prove useful to you.
Steve Schwartzman
October 10, 2018 at 6:34 AM
[…] you’re interested in photography as a craft, the newly added point 30 in About My Techniques applies to these two […]
You’ve gotta hand it to me | Portraits of Wildflowers
April 17, 2019 at 4:50 AM
[…] on the sunflower. If you’re interested in the craft of photography, points 3 and 8 in About My Techniques apply to today’s […]
Wet sunflower with dark clouds | Portraits of Wildflowers
June 25, 2020 at 4:39 AM
Many thanks for the compilation of the many different techniques in photography, Steve. I copied and pasted the entire article to print them out later. Very impressive work!
Peter Klopp
September 25, 2020 at 8:53 AM
[…] those of you interested in the craft of photography, points 1, 9, and 18in About My Techniques are relevant to today’s […]
Mexican water lily | Portraits of Wildflowers
September 14, 2022 at 4:24 AM
[…] those of you interested in the craft of photography,point 15 in About My Techniques applies to the top image,and point 20 to the bottom […]
In the pink | Portraits of Wildflowers
January 11, 2023 at 4:34 AM
[…] those of you interested in the craft of photography, techniques 15 and the newly added 33 in About My Techniques apply to the top photograph in this […]
A second day of ice | Portraits of Wildflowers
February 27, 2023 at 6:40 PM
[…] of you interested in the craft of photography will find points 1 and 15 in “About My Techniques” relevant to today’s […]
Return to Barkley Meadows Park | Portraits of Wildflowers
November 10, 2023 at 4:27 AM